

Application Deployment on AWS EKS: A Hands-On Project.


Introduction
Amazon EKS is a managed service that eliminates the need to install, operate, and maintain our own Kubernetes control plane on AWS.
In Kubernetes, a cluster is made up of two key components: the control plane and the data plane. The control plane, often referred to as the master plane, is responsible for managing the cluster's overall state, while the worker nodes make up the data plane and execute the workloads.
For enhanced availability, it's common to deploy a Kubernetes cluster with a three-node master architecture. This setup ensures that if one of the master nodes fails, the cluster can continue to operate without disruption.
Within the control plane, there are critical components, including the API server, etcd, scheduler, Controller Manager, and Cloud Controller Manager. These components are responsible for tasks such as managing cluster configuration, scheduling workloads, and interacting with cloud providers. On the worker nodes, components like the Container Network Interface (CNI) controller, container runtime (CR), DNS, and kube-proxy are installed to handle workload execution.
However, Kubernetes clusters may face various issues, such as master node failures, certificate expirations, slow API servers, etcd crashes, or scheduler failures. To address these challenges, Amazon Web Services (AWS) offers a managed Kubernetes service known as Amazon Elastic Kubernetes Service (EKS). EKS handles the control plane, allowing users to create and manage their worker nodes either on Amazon EC2 instances or using AWS Fargate, a serverless compute service that simplifies application deployment.
In practice, one of the worker nodes hosts the pods where applications are deployed. By default, these pods have cluster IP addresses, making them accessible only from within the cluster, which includes master nodes and other worker nodes. To expose these applications to the outside world and solve this problem, Kubernetes introduces the concept of services.
Services provide various types of IP exposure, including ClusterIP, NodePort, and LoadBalancer modes. In NodePort mode, applications become accessible through a specific port on all worker nodes. However, access is restricted to those who have access to the private Virtual Private Cloud (VPC) IP addresses.
Typically, the entire Kubernetes cluster operates within a Virtual Private Cloud (VPC), often a private one. This setup may require Elastic IP addresses and load balancers, incurring significant costs. To optimize costs, Kubernetes users often turn to ingress and ingress controllers.
Ingress and Ingress Controllers play a critical role in routing external traffic to services running within the cluster. Here is a more detailed explanation of Ingress and Ingress Controllers and how they work together:
Ingress: An Ingress is a Kubernetes resource that acts as a configuration file for managing external access to services within the cluster. It defines the rules for routing HTTP and HTTPS traffic based on hostnames and paths. Ingress resources specify which service should receive traffic, and they can also define other settings like TLS termination, rewrite rules, and more.
Ingress Controller: An Ingress Controller is a component or software that runs in our Kubernetes cluster. Its primary purpose is to watch for changes to Ingress resources and then configure the necessary components to make those rules and settings effective. The Ingress Controller effectively acts as a traffic manager and configures the load balancer.
Here's how the configuration and operation work:
Ingress Configuration: Start by creating an Ingress resource, specifying how external traffic should be routed to our services, including hostnames, paths, and other settings.
Ingress Controller Setup: An Ingress Controller continuously monitors for changes to Ingress resources. When it detects a new or updated Ingress, it reads the configuration details.
Load Balancer Configuration: The Ingress Controller configures the external load balancer or its own load balancer to match the Ingress rules, ensuring that incoming traffic is directed correctly.
Routing Incoming Traffic: Once the load balancer is set up, it routes incoming traffic based on the Ingress rules, such as hostnames or paths, to the appropriate services.
Service-to-Pod Routing: Services route traffic to pods using label selectors, ensuring that the traffic reaches the right pods, allowing for efficient external access management within the Kubernetes cluster.
This setup simplifies the management of external access and load balancing, enabling you to define complex routing and other features without handling low-level network configurations.
Deploying the Application in EKS
Prerequisite:
We have to install Kubectl, eksctl, and AWS CLI installed and configure the AWS CLI.
Step 1:
We have to create the cluster first using the Command below:
eksctl create cluster --name demo-cluster --region us-east-1 --fargate
We can use any of both Fargate or EC2 instances according to our need here we have used the fargate as we don't have to configure the instances.
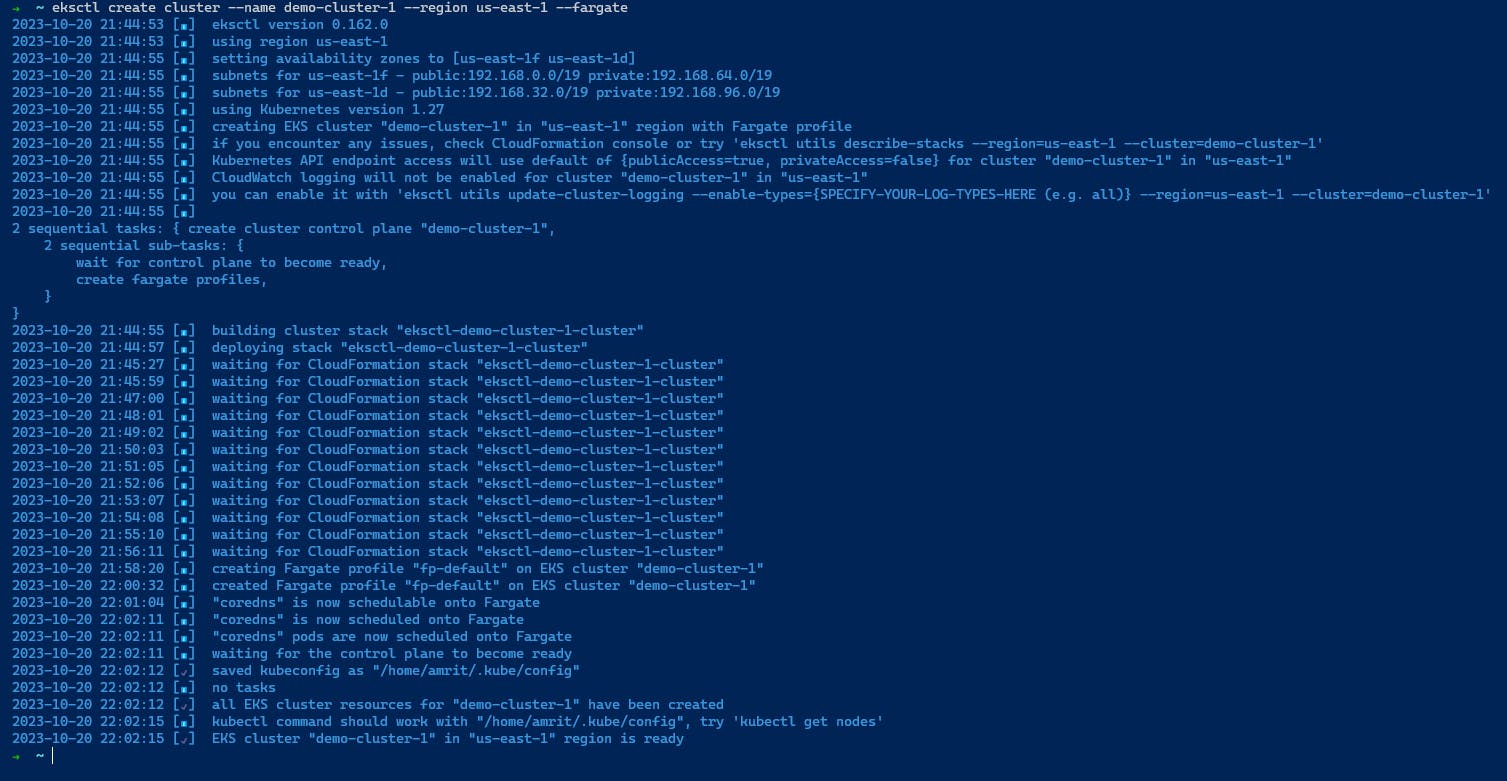
It will take some time to form the EKS Cluster.
Step2:
Now instead of using the AWS UI to find the information we download the kubeconfigfile for using the command line to get various information about the cluster.
We use the below command:
aws eks update-kubeconfig --name demo-cluster-1 --region us-east-1
Step3:
Now will deploy our application.
We will deploy our application in a new namespace so we have to create a namespace named game-2048.
So we have to create a new fargate Profile using the following command
eksctl create fargateprofile --cluster demo-cluster --region us-east-1 --name alb-sample-app --namespace game-2048

Now we have created the new fargate profile we will deploy our application in this fargate profile.
Step4:
Now we will create the pod, deploy, service, and ingress using the following command.
kubectl apply -f https://raw.githubusercontent.com/kubernetes-sigs/aws-load-balancer-controller/v2.5.4/docs/examples/2048/2048_full.yaml

Step5:
Now we will create the ingress controller that will look after our ingress resources and will create and configure the load balancer for us.
First, we have to set the IAM OIDC for the controller so it can talk to other AWS resources.
We can create IAM OIDC using the following command
eksctl utils associate-iam-oidc-provider --cluster $cluster_name --approve

Step6:
Now we will create the iam policy and also create the role attaching that policy to it.
Using the following command
Download IAM Policy:
curl -O https://raw.githubusercontent.com/kubernetes-sigs/aws-load-balancer-controller/v2.5.4/docs/install/iam_policy.json
Create IAM Policy:
aws iam create-policy \
    --policy-name AWSLoadBalancerControllerIAMPolicy \
    --policy-document file://iam_policy.json
Create an IAM Role attaching the Policy:
eksctl create iamserviceaccount \
  --cluster=<your-cluster-name> \
  --namespace=kube-system \
  --name=aws-load-balancer-controller \
  --role-name AmazonEKSLoadBalancerControllerRole \
  --attach-policy-arn=arn:aws:iam::<your-aws-account-id>:policy/AWSLoadBalancerControllerIAMPolicy \
  --approve
Step7:
Now we will create the Controller using the HelmChart which will create the load balancer. There are several Ingress controllers available for Kubernetes, each with its own Helm chart. Some popular choices include:
Nginx Ingress Controller
Traefik
AWS Load Balancer Controller
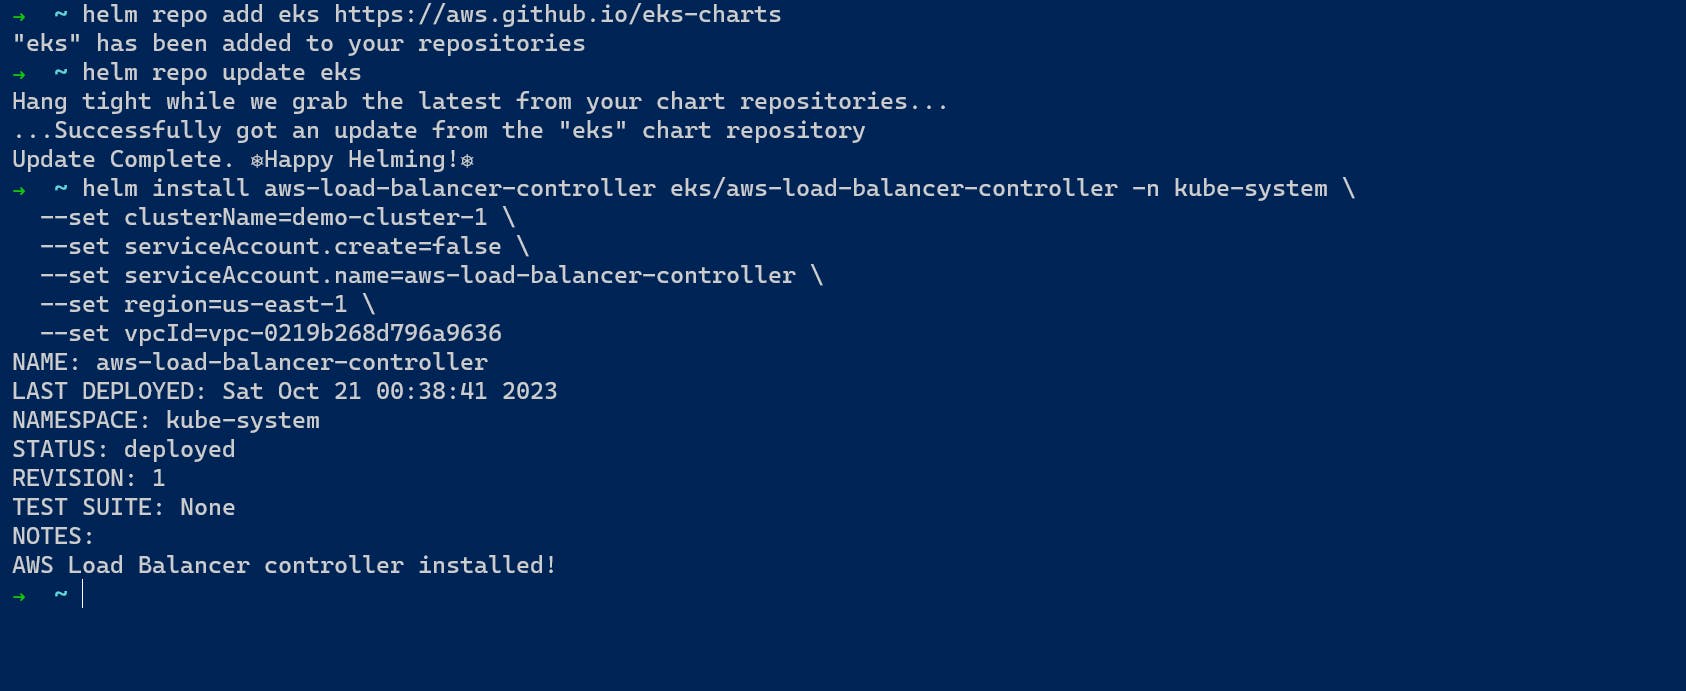
We will create the AWS Load Balancer controller with the following commands:
Add helm repo:
helm repo add eks https://aws.github.io/eks-charts
Update the repo:
helm repo update eks
Installing:
helm install aws-load-balancer-controller eks/aws-load-balancer-controller \
  -n kube-system \
  --set clusterName=<your-cluster-name> \
  --set serviceAccount.create=false \
  --set serviceAccount.name=aws-load-balancer-controller \
  --set region=<region> \
  --set vpcId=<your-vpc-id>
Verify that the deployments are running.
kubectl get deployment -n kube-system aws-load-balancer-controller
After this installing the Controller is complete.
Step8:
After the creation of the AWS Load Balancer, it will create the load balancer from where we can access the application deployed in the Pod.
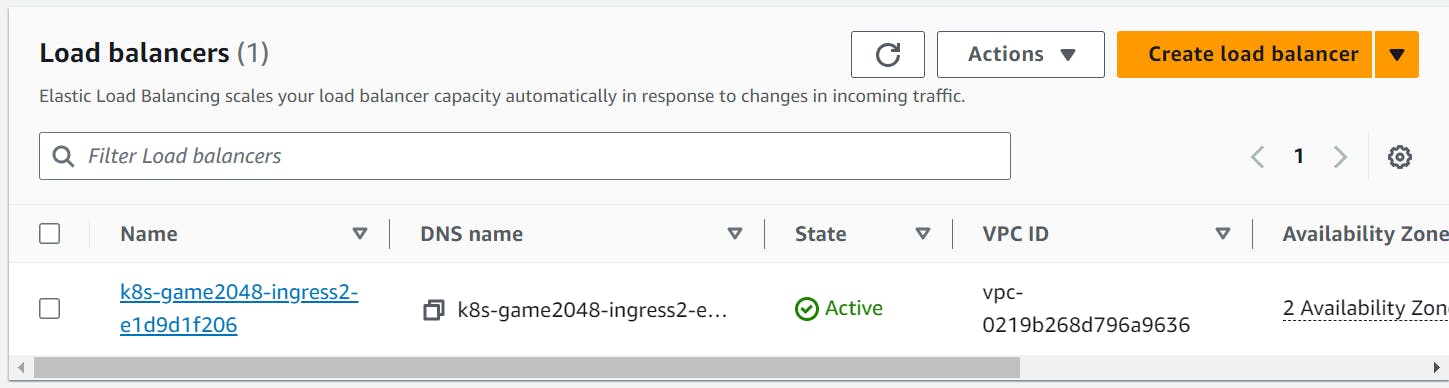
As we can see the load balancer is created now we can access the application using the DNS of the load balancer.
Step9:

In this way, We gain access to the Game through the load balancer
Conclusion
EKS (Amazon Elastic Kubernetes Service):
Pros:
Managed Service: EKS is a fully managed Kubernetes service provided by AWS. AWS handles the control plane, including updates, patches, and scaling. This frees us from the operational burden of managing the control plane ourselves.
Simplified Cluster Deployment: EKS simplifies the process of setting up and scaling Kubernetes clusters. We can create clusters with just a few clicks, making it easier to get started.
High Availability: EKS offers a highly available control plane that spans multiple Availability Zones, enhancing cluster resilience.
Integration with AWS Services: EKS seamlessly integrates with various AWS services, such as Identity and Access Management (IAM), Virtual Private Cloud (VPC), and Elastic Load Balancing (ELB), making it easier to build and scale applications on AWS.
Security and Compliance: AWS provides features like AWS Identity and Access Management (IAM) for fine-grained access control and auditing. EKS clusters can be more easily configured to meet security and compliance requirements.
Cons:
Cost: EKS is a managed service, which means there's a cost associated with it. While it simplifies operations, it may be more expensive than running our own Kubernetes cluster.
Limited Control: EKS abstracts some of the underlying Kubernetes management, which might limit control for advanced users who prefer full control over cluster components.
Self-Managed Kubernetes:
Pros:
Complete Control: Self-managed Kubernetes provides full control over every aspect of our cluster. You can customize and optimize it for our specific needs.
Cost Efficiency: While it may require more effort to set up and maintain, self-managed Kubernetes allows us to choose and optimize our infrastructure, potentially reducing costs compared to a managed service.
Community and Flexibility: We have access to the entire Kubernetes ecosystem and can take advantage of the open-source community's knowledge and resources.
Customizations: Self-managed clusters are ideal for organizations with unique requirements that go beyond what a managed service can provide.
Cons:
Complexity: Setting up and managing a self-managed Kubernetes cluster can be complex and time-consuming. It requires expertise in Kubernetes and infrastructure management.
Operational Overhead: We're responsible for maintaining and patching the control plane, which can be demanding in terms of time and effort.
High Availability: Achieving high availability in a self-managed Kubernetes cluster may require more manual setup and additional resources.
Security Concerns: Ensuring the security of a self-managed cluster is our responsibility, which can be challenging without a deep understanding of Kubernetes security best practices.
In summary, the choice between EKS and self-managed Kubernetes depends on our organization's specific needs and resources. EKS offers simplicity and ease of use, making it a good choice for those who want to focus on their applications without dealing with cluster management. Self-managed Kubernetes provides complete control and customization, making it suitable for organizations with unique requirements and the expertise to manage their clusters effectively.
[This Project is part of the 30-day AWS Learning series check out more here. ]